If your Keurig isn’t brewing like it used to, the pod holder might need a thorough cleaning or replacement. But how do you remove that little basket without damaging your machine?
You’re in the right place. This guide will walk you through easy, step-by-step instructions to safely remove your Keurig pod holder. By following these tips, you’ll get your coffee maker back in perfect shape, ensuring every cup tastes just right.
Keep reading—you’ll be surprised how simple it really is!

Signs You Need to Remove or Replace the Pod Holder
If your Keurig isn’t brewing right, your pod holder might need a quick fix or swap. Here are clear signs it’s time to take it out and clean or replace it.
1. Water Isn’t Flowing Properly: When water drips slowly or not at all, your pod holder or needle may be clogged. A deep clean usually restores smooth flow and better brewing.
2. Coffee Tastes Weak or Burnt: If your cup tastes off—either too weak or burnt—the pod holder could be blocking proper extraction. Cleaning it can bring back the fresh flavor you love.
3. Pod Isn’t Puncturing Right: When the K-Cup isn’t pierced cleanly, water can’t flow evenly through it. Check the pod holder and needle for buildup or damage, then remove and clean if needed.
4. Visible Clogs or Buildup: A quick look inside may show coffee residue or hard water deposits. This buildup blocks the needle and affects taste. Removing and rinsing the holder fixes it fast.
5. Leaks Around the Pod Area: If you spot water or coffee leaking near the pod holder, it may be misaligned or worn out. Replacing it ensures a tight seal and consistent brewing.
Safety Precautions Before You Begin
Before you remove your Keurig pod holder, take a minute to stay safe. A few simple habits can protect both you and your coffee maker.
Unplug Your Keurig First: Always unplug the machine before cleaning or removing parts. This simple step keeps you safe from electric shock.
Let It Cool Down: If your Keurig was just used, wait a few minutes. Letting it cool prevents burns from hot water or steam.
Avoid Metal Tools Near the Needle: Never use metal tools around the sharp needle. It can cause injury or damage the part. Use a plastic or wooden tool if needed.
Keep Hands Dry: Handle your Keurig with dry hands. This prevents electric shock and keeps your grip steady while removing the pod holder.
Tools You’ll Need to Remove the Keurig Pod Holder
Removing the Keurig pod holder requires a few simple tools. Having the right tools makes the job easier and safer. Gather everything before starting to avoid interruptions.
- Flathead Screwdriver: A flathead screwdriver helps pry the pod holder gently. It fits into small gaps without damaging the machine. Choose one with a comfortable handle for better grip.
- Needle-nose Pliers: Needle-nose pliers grip small parts and connectors firmly. They assist in pulling out the pod holder carefully. Use pliers with smooth tips to avoid scratches.
- Cleaning Cloth: A soft cleaning cloth wipes away dust and coffee residue. Use a lint-free cloth to keep parts clean during removal. It also protects delicate surfaces from scratches.
- Small Container Or Tray: A small container holds screws and tiny parts safely. Keep all components organized to prevent loss. This helps during reassembly of the pod holder.
Step 1: Prepare the Machine for Safe Removal
Preparing your Keurig machine is the first step to safely remove the pod holder. This step ensures no power runs through the device, preventing accidents. It also gives you easy access to the pod holder inside the machine.
Follow these simple steps carefully. They will make the process smoother and protect your Keurig from damage.
Unplug The Keurig
Always unplug your Keurig before starting any maintenance. This cuts off the power supply completely. It protects you from electric shock during the process.
Find the cord at the back of the machine. Gently pull it out from the socket. Never yank the cord. This keeps the cable and plug in good condition.
Open The Lid
Next, lift the lid of your Keurig machine. This reveals the pod holder inside. Open the lid carefully to avoid breaking the hinge or plastic parts.
With the lid open, you can see the pod holder clearly. This makes it easy to remove without forcing anything.
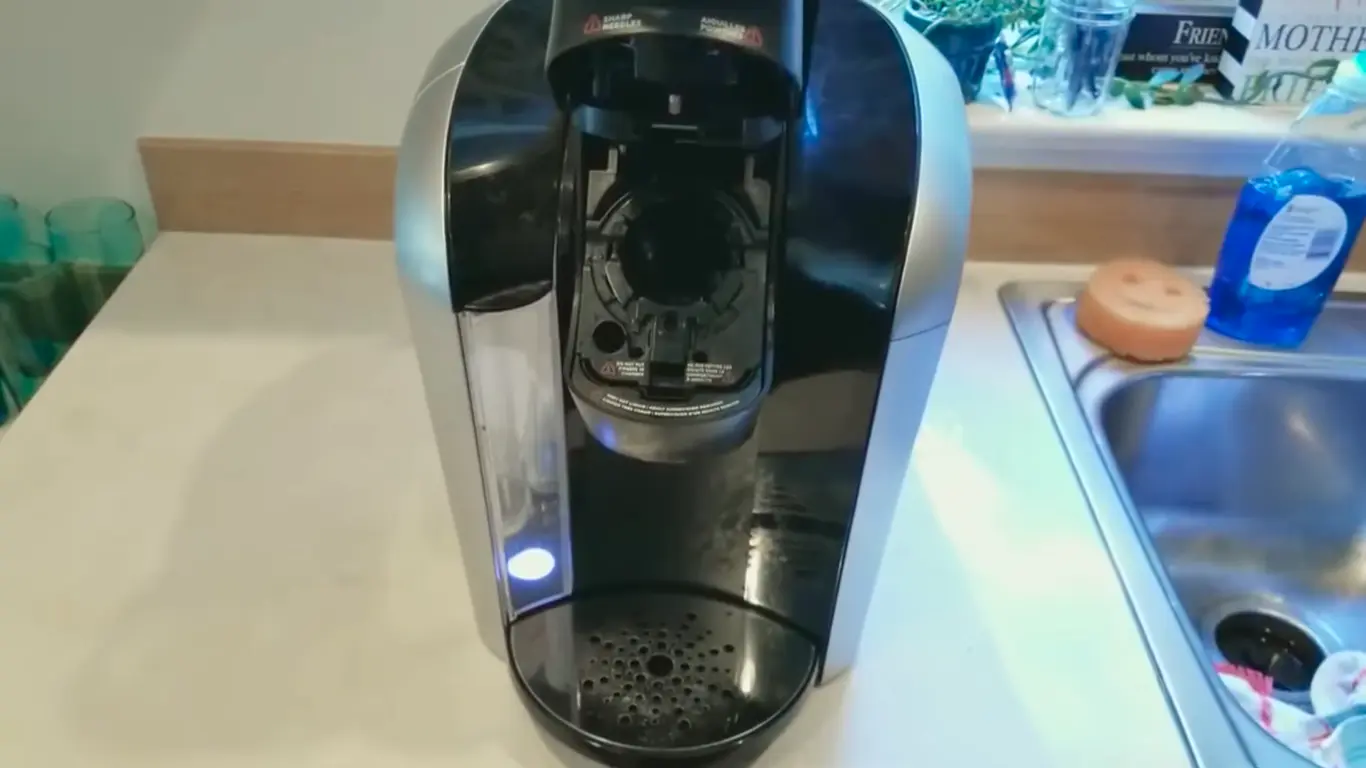
Step 2: Locate the Pod Holder Inside Your Keurig
Finding the pod holder is the first step to removing it from your Keurig machine. This part holds the K-Cup pod during brewing. Knowing its exact location makes the removal process easier and quicker.
The pod holder is usually inside the coffee machine, where you place the K-Cup pod. It fits snugly in the brew chamber, ensuring the coffee brews correctly. Locating it helps you understand how to handle the next steps safely.
Open The Keurig Lid
Start by lifting the lid of your Keurig machine. This reveals the brew chamber where the pod holder sits. The lid opens upwards on most models, giving clear access.
Identify The Pod Holder Inside
Look inside the brew chamber for a small basket-like part. This is the pod holder. It holds the K-Cup pod firmly during brewing. It may appear as a round or oval-shaped piece.
Check For The Release Mechanism
Some Keurig models have a release button or tab near the pod holder. This helps to unlock the holder for easy removal. Finding this mechanism will guide you on how to remove the pod holder safely.
Step 3: How to Remove the Keurig Pod Holder (3 Easy Methods
Removing the pod holder from your Keurig is a key step for cleaning or fixing issues. This part holds the coffee pods and can get clogged or dirty over time. Detaching it carefully helps maintain your machine’s performance and taste.
Follow simple methods to remove the pod holder safely. No special tools are needed. Just a bit of patience and gentle handling.
Lift And Pull Method
Open the Keurig lid fully. Locate the pod holder inside the machine. Grip the pod holder firmly from the sides. Lift it straight up gently. Pull the pod holder out slowly. Avoid using force to prevent damage. This method works best for most Keurig models.
Wiggle Technique
If the pod holder feels stuck, try the wiggle technique. Hold the pod holder and move it side to side. Apply light upward pressure while wiggling. This loosens any tight spots or debris. Keep wiggling until the pod holder comes free. Take your time and handle it gently so no parts break.
Release The Assembly
Some Keurig models have a clip or latch holding the pod holder assembly. Look for a small release tab near the base. Press or lift this tab carefully to unlock the pod holder. Then pull the assembly out. This step may require checking your model’s instructions for exact details.
Step 4: Disassemble and Clean the Pod Holder
Disassembling the Keurig pod holder is an important step to clean or fix your coffee maker. Taking it apart allows you to reach hidden parts where coffee grounds and debris collect. This keeps your machine running smoothly and your coffee tasting fresh.
Careful disassembly prevents damage and makes cleaning easier. Follow simple steps to separate the parts and access the needle inside.
Separate The Components
Open the Keurig machine and lift the pod holder carefully. It usually consists of two main parts: the outer basket and the inner drip tray. Gently pull these components apart by hand. Avoid using tools that can scratch or break the plastic.
Once separated, you can see inside the pod holder. This step is crucial to remove trapped coffee grounds and buildup.
Access The Needle
Inside the pod holder, you will find a sharp needle that pierces the coffee pods. This needle often gets clogged with coffee residue. To clean it, look for a small opening or cover near the needle.
Use a paperclip or a needle cleaning tool to clear any blockages carefully. This improves water flow and ensures better coffee extraction.
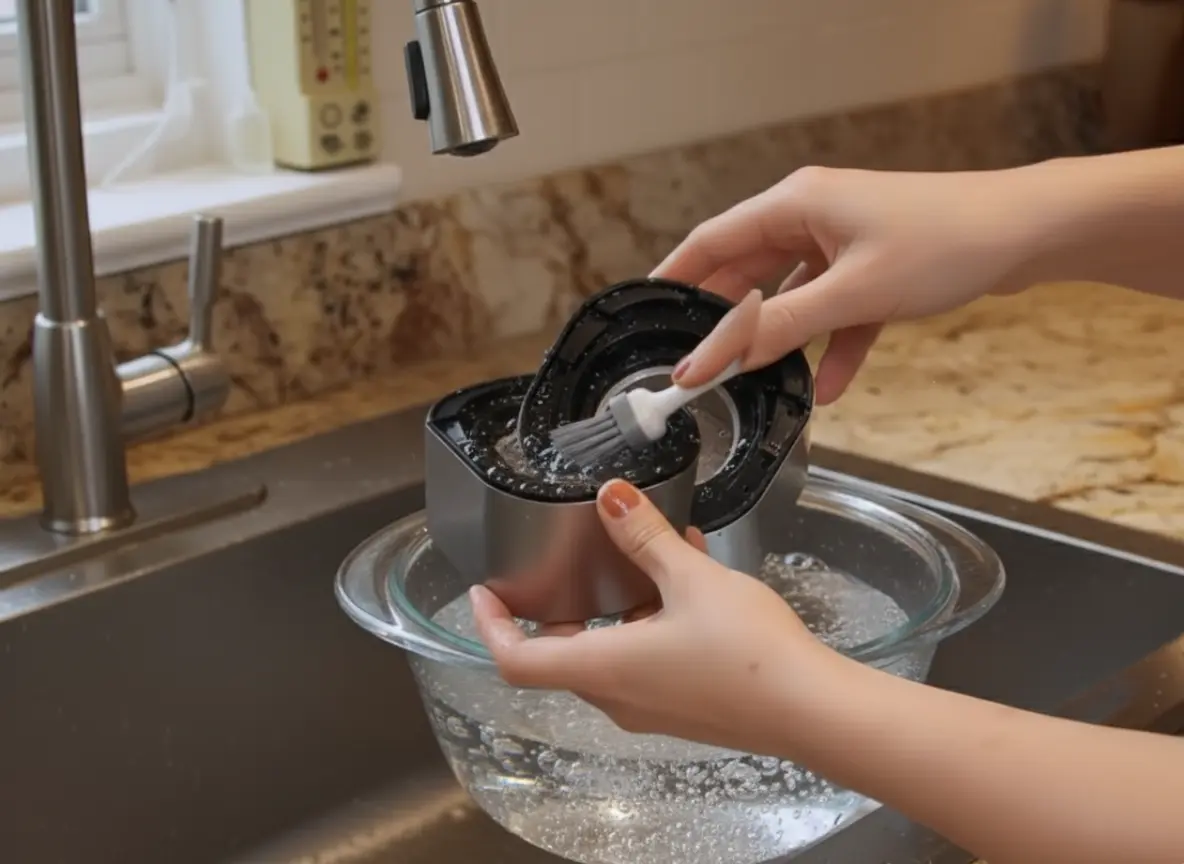
Clean The Pod Holder:
Cleaning the Keurig pod holder is key for great coffee taste and machine health. Over time, coffee oils and residue build up inside the holder. This can block water flow and affect flavor. Regular cleaning stops clogs and keeps your Keurig working well.
Use Vinegar Solution
Prepare a mixture of equal parts white vinegar and water. Soak the pod holder in this solution for 10 to 15 minutes. Vinegar breaks down coffee oils and mineral deposits. After soaking, use a soft brush to scrub any leftover residue. This step ensures a deep, effective clean.
Rinse And Dry
Rinse the pod holder thoroughly with warm water. Make sure all vinegar and loosened debris wash away. Dry the pod holder with a clean towel or let it air dry completely. A dry pod holder prevents mold and keeps your coffee fresh. Always clean and dry before reassembling to avoid damage.
Step 5: Reassemble and Reinstall the Pod Holder
After removing and cleaning the Keurig pod holder, the next step is to reassemble and reinstall it. This process ensures your coffee maker works properly and safely. Follow simple steps to put the parts back together without damage. Take your time to fit every piece exactly as it was before.
Attach Pod Holder Parts
Start by aligning the two main parts of the pod holder. Make sure the needle and plastic edges fit perfectly. Press the parts firmly but gently to avoid breaking anything. Confirm the holder is secure and no gaps appear. This step restores the pod holder’s function and keeps the coffee flow smooth.
Snap Back Into Place
Once the pod holder parts are attached, slide the holder back into the machine. Slide it in slowly until you hear a click or feel it snap into place. Do not force it, as this may harm the machine. The pod holder should sit flush and stay firmly in place. Check by gently pulling to ensure it won’t come loose during use.
Aftercare and Maintenance Tips
A little care keeps your Keurig running strong every day. Here’s how to make it last longer and brew better coffee.
- Run a Hot Water Cycle: After putting it back together, run one hot water cycle. This clears out vinegar and dust, keeping each cup fresh.
- Use Filtered Water: Filtered water stops scale and keeps the needle clean. It also gives smoother coffee and helps parts last longer.
- Store in a Dry Place: Always store your Keurig in a cool, dry spot. This prevents mold and protects the pod holder from rust.
- Descale and Clean the Needle Regularly: Descale every few months and clean the needle often. This keeps water flowing right and your coffee tasting great.
How Often to Clean or Replace the Pod Holder
Keeping your Keurig clean helps it brew smooth, tasty coffee. Here’s how often you should clean or replace the pod holder for best results.
- Clean Every 1–2 Weeks (Heavy Users): If you brew daily, clean the pod holder every week or two. This removes coffee oils and clogs that block smooth water flow.
- Clean Monthly (Light Users): If you use your Keurig less often, clean it once a month. It stops old coffee residue from affecting the flavor of your cup.
- Replace Every 6–12 Months: Check for cracks or buildup every few months. Replace the holder every 6–12 months if it looks worn or clogged.
Why It Matters: Regular care keeps your Keurig fresh and working well. Clean parts give better flavor and help your coffee maker last longer.
Common Mistakes to Avoid
Even a simple task like removing a Keurig pod holder can go wrong if you rush it. Here are quick tips to avoid common mistakes and keep your machine safe.
Forcing Stuck Parts: Never pull hard if the pod holder won’t move. A gentle wiggle usually frees it without breaking anything.
Using Metal Picks Near the Needle: The needle is sharp and delicate. Metal tools can bend or dull it—use a paperclip or soft brush instead.
Skipping the Drying Step: Moisture inside the pod holder can lead to mold. Always dry every part fully before putting it back.
Not Unplugging Before Cleaning: Cleaning while plugged in risks electric shock. Always unplug first, even for a quick wipe.
Using Harsh Chemicals: Strong cleaners can damage plastic parts. Stick with mild vinegar or dish soap for safe, effective cleaning.
FAQs About Removing a Keurig Pod Holder
How To Remove Tray From Keurig?
To remove the tray from a Keurig, lift the drip tray straight up while keeping it level. Avoid spilling any liquid. Clean it with a damp, soapy cloth and rinse thoroughly. Reattach by aligning and sliding it back into place.
How Can I Take My Keurig Apart To Clean It?
Open your Keurig, lift and remove the K-cup holder assembly. Separate the pod holder parts to access the needle for cleaning. Rinse with warm, soapy water, then dry before reassembling. Avoid harsh abrasives to protect your machine’s components.
How Do You Remove The Needle Basket From A Keurig?
To remove the needle basket from a Keurig, open the brew basket. Squeeze the sides gently and pull the basket upward to release it.
How To Clean A K Cup Holder With Vinegar?
Remove the K cup holder from your Keurig. Soak it in a vinegar-water solution for 30 minutes. Rinse thoroughly and dry before reassembling.
How Do I Safely Remove The Keurig Pod Holder?
Open the brewer, lift the pod holder gently, and pull it straight up to detach it.
Final Thoughts: How to Remove Keurig Pod Holder
Removing the Keurig pod holder is simple with the right steps. Start by opening the machine carefully. Gently pull out the pod holder without forcing it. Cleaning or replacing it becomes easier this way. Regular maintenance improves your coffee maker’s performance.
Keep your Keurig working smoothly and enjoy fresh coffee every time. Practice these steps to save time and avoid damage. Your coffee routine will stay hassle-free and enjoyable.

Hi, I’m Joshua Miller, a U.S.-based food lover, review writer, and Co-founder of KitchenWink.com. I hold a Bachelor of Science in Food Science and Culinary Technology, and for over five years I’ve been testing kitchen gadgets like air fryers, blenders, and other cooking tools.
I’m also a home cook, so every product I review is tried in real kitchens—not just in theory. My reviews are based on real results, simple fixes, and tips that anyone can use. With both formal training and hands-on testing, I make sure my advice is clear, honest, and practical.
My goal is simple: to help home cooks choose the right tools and make cooking easier every day.